
Renting time in a green screen studio opens the door to all sorts of creative work. Whether you’re working on a commercial, producing a new jingle package, or filming a video for your brand, making the most of each minute in a rented space can save both frustration and money. Post-production is only part of the story. The real difference often happens in how prepared you are when you walk into the studio.
If you’re searching for a green screen studio rental in Cincinnati and planning to create commercials, jingles, or other branded content, a little advance planning will go a long way. It’s not just about showing up. It’s about using your session wisely to bring your ideas to life without running out the clock. The more organized you are from the start, the smoother it’ll go once the lights come on and the camera starts rolling.
Planning Your Shoot
Before stepping into any studio, the smartest move is creating a clear plan. This helps avoid wasting time and energy when you’re on the clock. Whether you’re filming a direct-to-camera script or producing a video that brings a jingle to life visually, having a plan easily shaves off delays.
A solid pre-production plan should include:
- A detailed shot list: Write down every shot you need, from start to finish, including angles, transitions, and any props or costume changes. If jingles are involved, think about matching visuals to the musical beat or lyrics.
- A script or storyboard: Think of this like your blueprint. It lets everyone from producers to talent know what’s happening next.
- Timing plan: Estimate how long each section will take. Budget in a little room for retakes, but keep things tight so each moment counts.
- Talent and crew updates: Send out your plan in advance to everyone involved so people can ask questions before showing up. Less confusion means more shooting.
It may seem like a lot of prep, but this saves time once you’re inside the studio. Even a 20-minute delay planning shots can throw your whole session off track. Simple steps at this stage make way for better-looking final products that are on brand, well-paced, and useful for marketing now and later.
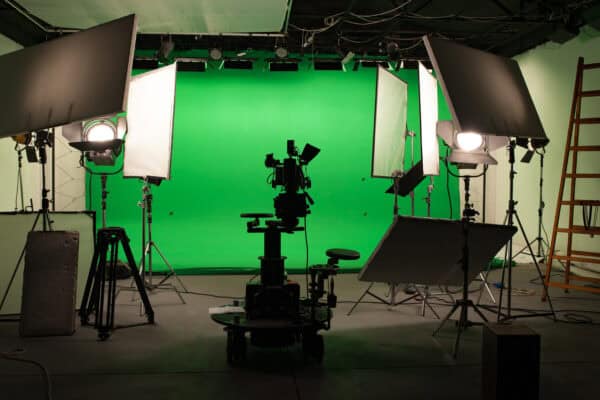
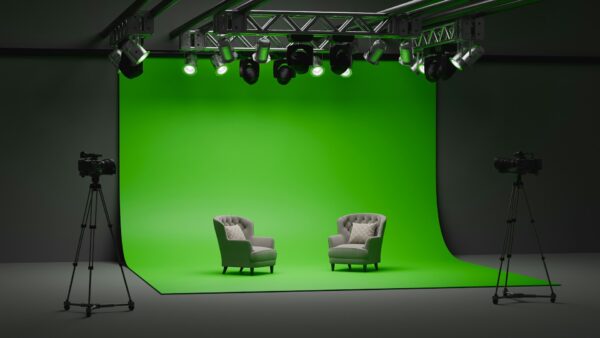
Setting Up The Green Screen
Once you’re inside the studio, setup matters. No matter how creative the vision is, the wrong screen or light setup can make editing a nightmare. It doesn’t take much—an uneven screen, a strange shadow, or poor lighting can leave your footage unusable for post-production. If you’re adding jingles or music in later, the visuals need to be clean and crisp enough to blend with those elements smoothly.
Here are a few things to focus on when setting up your green screen:
- Make sure the green screen is completely stretched out. Wrinkles or sags throw off even lighting and create strange shadows.
- Use soft, even lighting from both sides and above, if available. Hot spots or dark corners make keying much harder later.
- Keep a decent distance between your subject and the green screen. This stops green reflections from bouncing onto clothes or skin.
- Avoid green in wardrobe or props—it will disappear in post-production.
One example: someone once brought a prop guitar with green trim for a music shot. It looked great in person, but on screen, the trim turned invisible during editing and ruined the take. It’s small details like that which are easy to miss but could eat up massive time during post-editing if not addressed early on.
Taking the time to get the background right gives you sharper footage and guarantees your video and music elements match up with less work later. This also helps when syncing voiceovers, music jingles, or sound effects that are often layered in later stages.
Utilizing Technology And Tools
Good equipment helps, but knowing how and when to use it matters even more. When you’re inside a green screen studio, time is limited, which means everything from cameras to software should already be dialed in. If your shoot includes jingle production, commercial video, or social content, every piece of gear and tech needs a role and a reason.
First off, make sure your camera settings are tested before you start rolling. Simple things like frame rate, resolution, or white balance can derail a clean edit if they’re off. Studios often provide tools like boom mics, green screen backdrops, and rigs for steady shots, but you’ll still need to bring or rent things like hard drives, extra batteries, and backup memory cards.
Post-production software also plays a big part here. If you’re editing with green screen effects, software like Adobe Premiere Pro or DaVinci Resolve can save time, especially if you’re layering in jingles or voiceovers. Plugins and templates can speed up transitions or animation effects. Even more basic apps like Final Cut can do the job well if your setup is simple.
Here’s where having a skilled crew really makes a difference:
- Camera operators who know how to frame for green screen space
- Sound engineers who understand clean vocal recording to go with your jingle
- Editors who can pull clips together quickly and adjust colors, lighting, or match audio
If your team doesn’t include tech-savvy folks, it’s worth hiring help before you head into the studio. You don’t want to be figuring out software settings or mic levels when the clock is ticking on your studio time. Every piece of tech should work for you, not against you.
Incorporating Multimedia Elements
On a green screen, the final product leans heavily on what you add later like sound, motion graphics, and musical layers. Even with perfect lighting and camera work, a bland edit can fall flat without good multimedia integration. That’s why planning your audio and visual matchups ahead of time has a real payoff.
If you’re incorporating jingles, consider how the visuals will change with each beat or chorus. Short cuts between product shots, brand visuals, or on-screen text engage better when they move with the rhythm. Sound effects also add energy, especially for transitions or scene changes. Timing matters more than most people think. Sloppy timing can throw off the viewer and make even the most expensive jingle feel out of place.
Here are a few ways to combine multimedia for better results:
- Use music cues to guide your edit points or title cuts
- Add lower thirds or graphics that animate in sync with voiceover narration
- Include sound effects that pop like swishes or clicks that follow camera movement
- Mix footage with branded audio to tie in your message
- Match lip sync accurately if recording voiceover during or after the shoot
One time, a brand paired a simple green screen shoot with custom music but forgot to align their video cuts with the changes in the melody. Their final video felt off, even though the visuals and audio were both high quality. They ended up re-editing everything to fix the pacing. Syncing jingle hooks to movement or text isn’t hard to do with a clear blueprint. It just takes a few extra minutes of planning.
Whether you’re filming for paid media spots or running campaigns through social channels, the way music, sounds, and visuals stack together says a lot about your brand’s polish. A well-produced video sticks around longer in people’s minds.
Wrapping Up Your Session Efficiently
In a green screen studio, wrap time arrives fast. It’s easy to assume you got it all and realize later that a key shot is missing or a sound file didn’t save properly. Before you break down, take a moment to confirm everything is how it should be.
Start with a playback session right there in the studio. Quickly rewatch takes to check for simple issues like poor focus, bad angles, or lighting glitches that weren’t obvious while shooting. If your session involves jingle playback, make sure the recorded takes line up with the music or beats. It’s better to reshoot while you’re present than try to fix things later.
When it comes to packing up, stay organized so nothing gets left behind. Store mics, cables, and props in labeled cases or bags. Double-check battery chargers or rented gear, and be sure any footage is downloaded and properly backed up before you leave. Cloud storage or an external hard drive can make a big difference if something goes wrong on the road.
Here are a few tips to help wind things down cleanly:
- Wrap props or delicate equipment first
- Label drives or folders as you save your files
- Return any rented items clean and ready for the next user
- Do a final walk-through to make sure nothing’s left behind
Getting everything in order not only helps you leave the studio in good shape, but it also makes your editing process easier. When files are sorted, backups are secure, and footage has been reviewed, you’ll head into post-production with confidence.
Let Your Creative Work Stand Out
When used with purpose, a green screen studio is more than just a space with lights and a backdrop. It’s where creative ideas, sound, and visuals come together to tell a brand’s story. But to get there, each step from planning to packing has to be tight. Skipping even small details in the setup or workflow can slow everything down and cut into your results.
Whether you’re producing a lively commercial jingle, filming scenes for a promo, or recording voiceover content, how you manage your studio time directly affects how polished that final video will look and sound. Good planning, smart use of tech, and seamless multimedia all play a part.
And if you’re considering a green screen studio rental in Cincinnati, running through this checklist before your shoot will keep your projects moving faster and your results looking cleaner. It’s not about rushing. It’s about being ready. Being prepared means more time spent on the fun stuff, like tweaking visuals and perfecting your audio mix, and less time scrambling for a missing cable or fixing lighting problems in post.
To make your next production stand out, consider booking a green screen studio rental in Cincinnati with Killerspots Agency. Our team can help bring your creative vision to life with professional support and high-quality studio space. Call us at 513-270-2500 to discuss your project or schedule your time.